
The new Publishing Workflow adds draft and publishing mechanisms to the Custom Page Dashboard in the Layout & Design Tool. You can now create and modify pages in a draft state before making them available for public access, with the ability to switch the status of pages from published to draft or vice versa. The dashboard also includes information regarding the pages, such as names, URL slugs, status, and quick actions, like edit, unpublish/publish, and delete a page.
With the new workflow, you can manage all your custom pages safely by creating or editing pages in draft mode. This is especially useful for seasonal campaigns, holiday offers, or time-bound events, allowing you to prepare everything in advance, keep the page hidden, and publish it exactly when you’re ready, with just a click.
Key Benefits:
- Create and preview custom pages in draft mode and work on them safely without exposing anything to the public.
- Go live instantly or take a page offline whenever needed, just with one click, all while keeping your site stable.
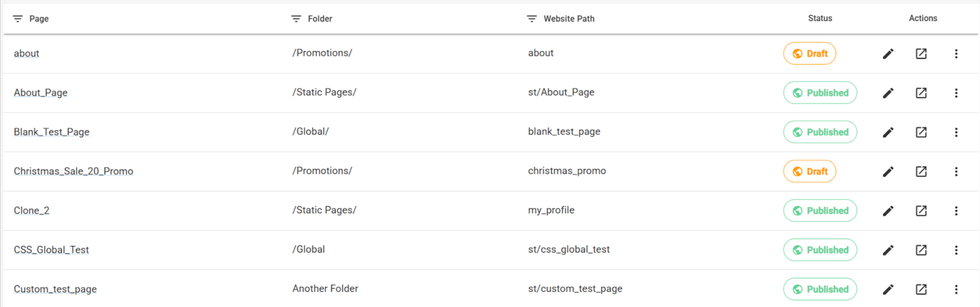
The Custom Page Dashboard
You can access the Custom Pages Dashboard in Layout & Design Tool by opening its sidebar and then going to Pages/Web & Landing Pages > Custom > Manage All.
Let's Navigate through Dashboard Elements:
- Page: Shows the page name and a link to its edit view in the Layout & Design (L&D) Tool.
- Folder: Indicates the folder where the page is stored within the L&D Tool.
- Website Path: Displays the URL slug.
- Status: Indicates whether the page is Published (accessible to all users) or Draft (visible only to logged-in users).
- Edit: Opens the page in the L&D Tool in a new tab.
- Preview: Opens a preview in a new tab. If the page is unpublished, the preview will show B-Test parameters. For drafts, without these parameters, the page will return a 404.
- On clicking the three dots in the last column, you can either publish/unpublish the pages.
- Delete: Permanently deletes the page.
Publish a Custom Page
You can manage the publish status of a custom page either from the Custom Page Dashboard, selecting the Actions (three-dot menu) and clicking on the Publish entry.

Or click on that button directly from the Custom Page’s topbar:

Then just confirm the action when prompted:

Unpublishing works in the same way. If you publish a page, that action/button will be replaced with Unpublish, which will restrict access to its URL by returning a 404 error.
Redirects for Unpublished Custom Pages
If you unpublish a page but wish to redirect its traffic (e.g., routing an old Black Friday URL to a general “Offers” page), follow this workflow to avoid URL conflicts:
- Open the custom page
- Remove the custom path by clicking on the topbar’s pencil and clearing the field.
- Then click the Save button to save the change.
- Go to our Redirects Dashboard (ie: domain.com/r/dashboard/redirects)
- Create a new redirect pointing from the path of the unpublished page to the path you want to redirect to.


© 2026 RebelMouse. All rights reserved.
Comments Moderation Tools