

Many RebelMouse clients use an infinite scroll of content (which we call Social UX for Media) to give their readers a constant stream of content down a web page. We’ve recently updated the UI and UX in our Layout & Design Tool (L&D) to be able to precisely control what content is shown in what spot in the scroll. In addition, with these updates you can also precisely control what is shown in any post module on your site, be it a sidebar, interstitial, etc.
While we’ve always supported filtering content via L&D, these updates have allowed for greater flexibility and control. In this article, we fully describe how to filter content by related content, specific sections or tags, time frames, and much more!
Social UX for Media

Social UX for Media is a way to use infinite scroll to show visitors to your site as much content as they care to see, without the need for additional clicks. Have a look at RebelMouse-powered Austonia to see an example of Social UX for Media in action.
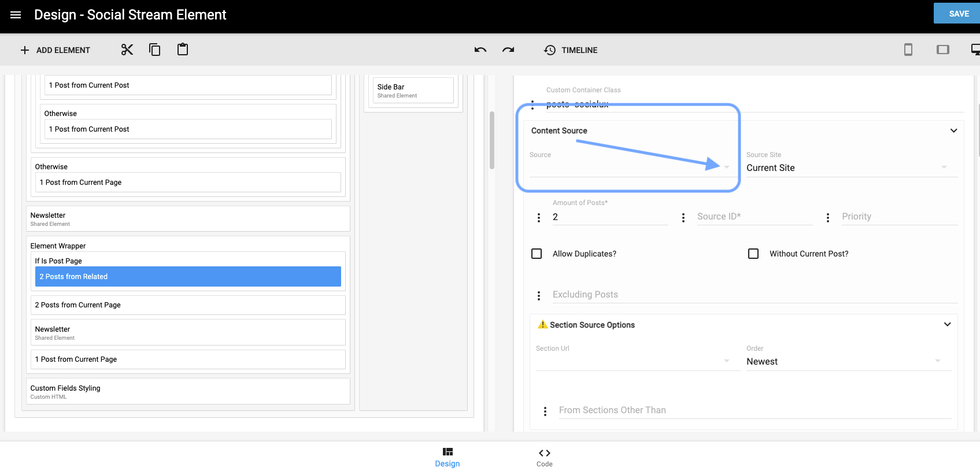
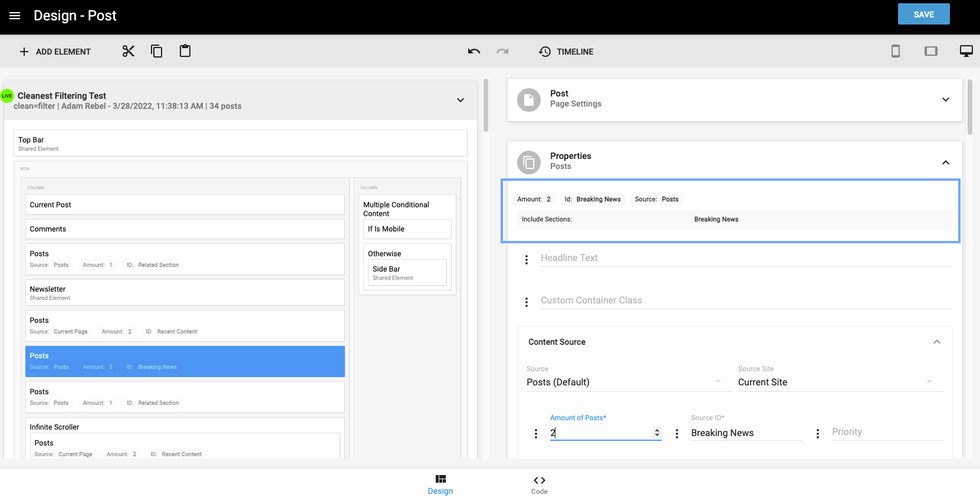
To get started in understanding how this is set up from a development perspective, here’s a screenshot of a very simple Social UX for Media layout in L&D, where we have the current post set to display, and then an infinite scroll of content to populate right after:
Note that the screenshot above is from the original setup in L&D. We’ll examine it briefly, but the newly updated L&D will have a slightly different UX. We will explore that in great detail after setting the stage using the original view.
You can see that we have a Multiple Conditional Content element that begins with “If Is Post Page.” This element has another Multiple Conditional Content element nested inside of it, composed of “If Is Desktop” and “Otherwise.” This tells the system that if a user lands on a post page (from Google, or Facebook, or a link, etc.), then show that post (Current Post). We are also specifying how to display the post depending on if the user is on desktop, or either mobile or tablet (Otherwise). You can’t see it in the screenshot, but there is different styling applied to the Current Post element depending on which conditional it resides under.
The final “Otherwise” in the all encompassing Multiple Conditional Content element is indicating that we should show “1 Post from Current Page,” meaning wherever we land on the site that is not a post page (section page, home page, tag page, etc.), we should show one post from that page.
Next you will see an Element Wrapper that encloses three distinct elements. First, a Posts element that pulls two posts into the scroll, then an interstitial newsletter banner, followed by another two posts into the scroll. This wrapper will repeat itself down the page, resulting in the following content flow:
- 2 posts
- Newsletter module
- 2 posts
- 2 posts
- Newsletter module
- 2 posts
- …
Clearly this is a very simple example (though still a powerful tool to help users consume more content), but this is also where it gets really fun! We can now customize that content flow incredibly precisely. We’ll explain and document just how to do this below. From here on out, we’ll be looking exclusively at the new version of L&D that has our enhanced filtering mechanisms.
Targeting Content by Sections
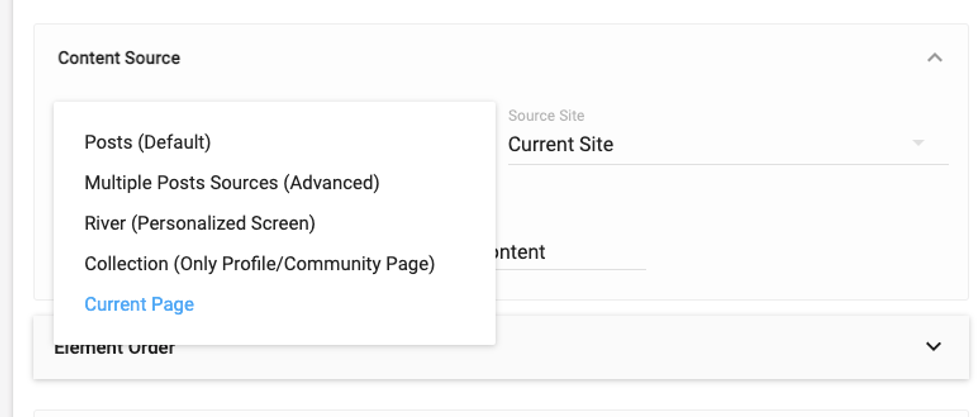
Let’s say that I want to have my first block of content come specifically from my section Breaking News. Because this is a new update, the first thing we need to do is select the Content Source:
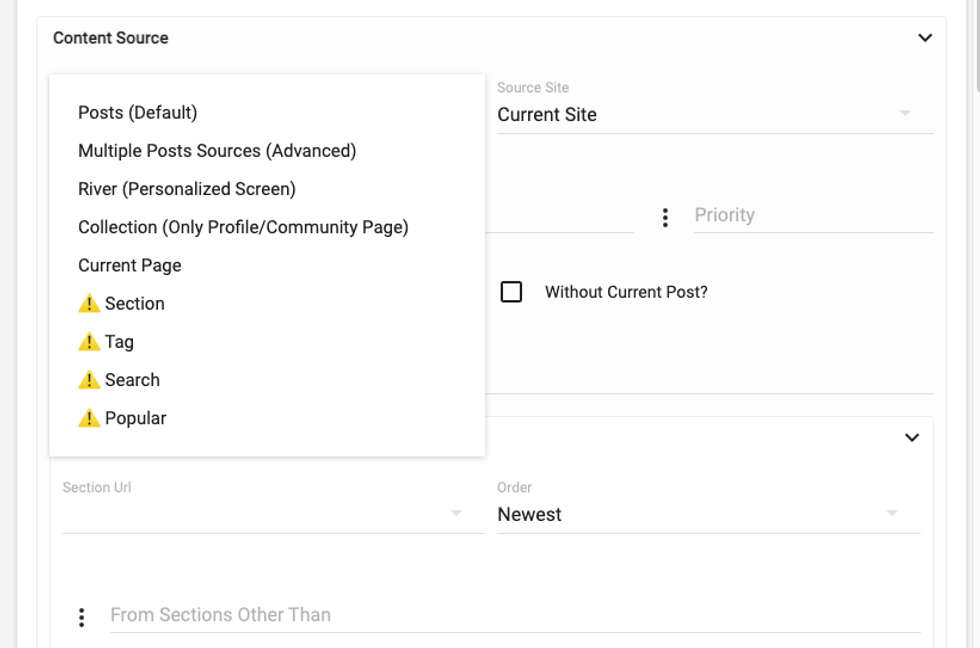
When you first click on the drop-down menu, you will see several warning signs. These are shown to let you know that the old way of filtering is not supported anymore, but trust us, what comes next is better!
Again, don’t be scared by the warning signs. They’re just there to let you know that you will be using the new system once you make your selection. If you’re making an update to your filtering, we’d recommend starting on a B-test layout so that your live view doesn’t change until you are absolutely ready for it to.
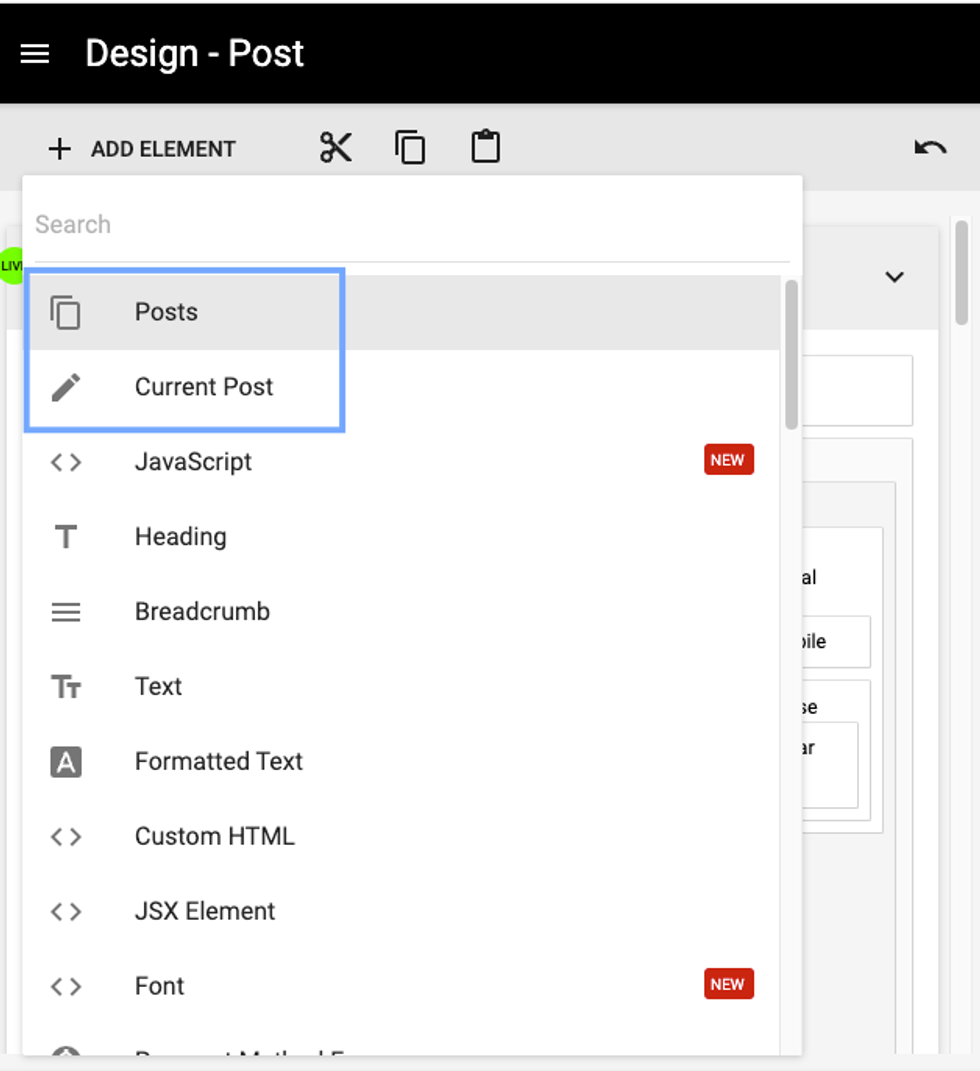
Note that in the following example, we are updating the current Posts elements to the new version. You can also start fresh by selecting a Posts element from the element list:
Opting to start fresh with a new Posts or Current Post element will require styling, since the element is not exactly the same as the original Posts element. You can simply add CSS styling to the new element to achieve the look that you require.
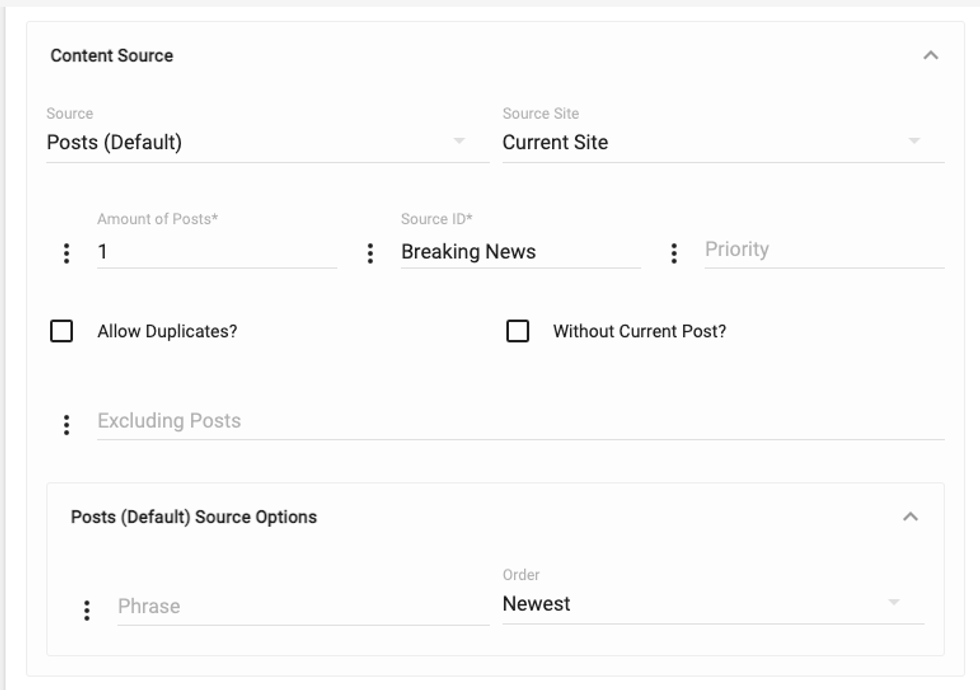
For this example, we’ll go with the simplest selection: Posts (Default). This will allow us to select the number of posts, priority level (more on this later), and do any number of filtering. Let’s continue. We will start by making sure we have all of the data necessary for the Content Source. Here’s a view of all the fields:
- Source:
- Posts (Default): Allows for pulling content (posts) into the content scroll with robust filtering available.
- Multiple Posts Sources (Advanced): Allows for pulling content into the content scroll from multiple sources (see below for a full description).
- River (Personalized Screen): If you are using a community feature, this will pull in content based on a user’s profile (topics of interest, followed users, etc.).
- Collection (Only Profile/Community Page): This is a rarely used feature for sites that have user collection pages.
- Current Page: Allows for pulling content that is assigned to the current page. In other words, if you are on a section page, this will pull content from that section, if you’re on a tag page, it will pull content with that tag, and so on.
- Source Site: This is applicable if you are using Community features on RebelMouse.
- Amount of Posts: Specifies the number of posts to pull into the feed.
- Source ID: Free-text field used to define the content. Add a descriptive phrase for the type of content being pulled, e.g., Breaking-News.
- Priority: Posts elements with higher priority will load content before Posts elements with lower priority.
- Allow Duplicates: Tick the box to allow duplicate content to show up in the feed.
- Without Current Post: Tick the box to allow duplicate content except for the current post.
- Excluding Posts: Allows you to exclude specific posts from the content feed.
- Posts (Default) Source Options: Allows you to use a search phrase to pull posts, determined by our search algorithm, into the content feed.
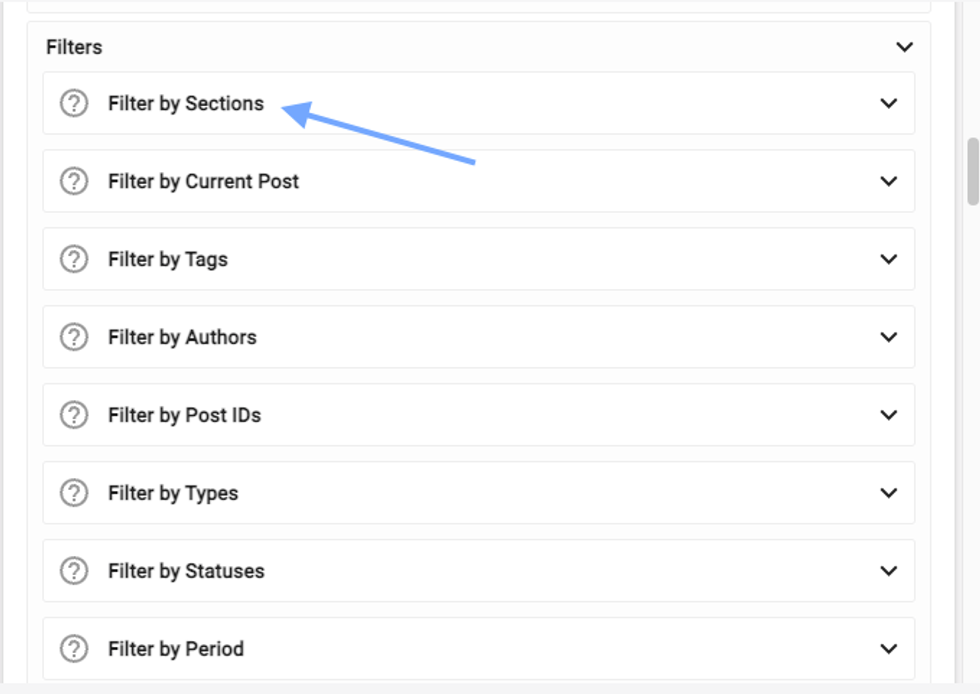
As we saw at the beginning of this post, we’re currently showing two posts from Current Page. Let’s change this to show two posts from our Breaking News section. Scroll down the right side of L&D until you see the Filters module. The first one you see will be the Filter by Sections filter:
Click the down caret and you’ll see all of the available options for filtering by sections:
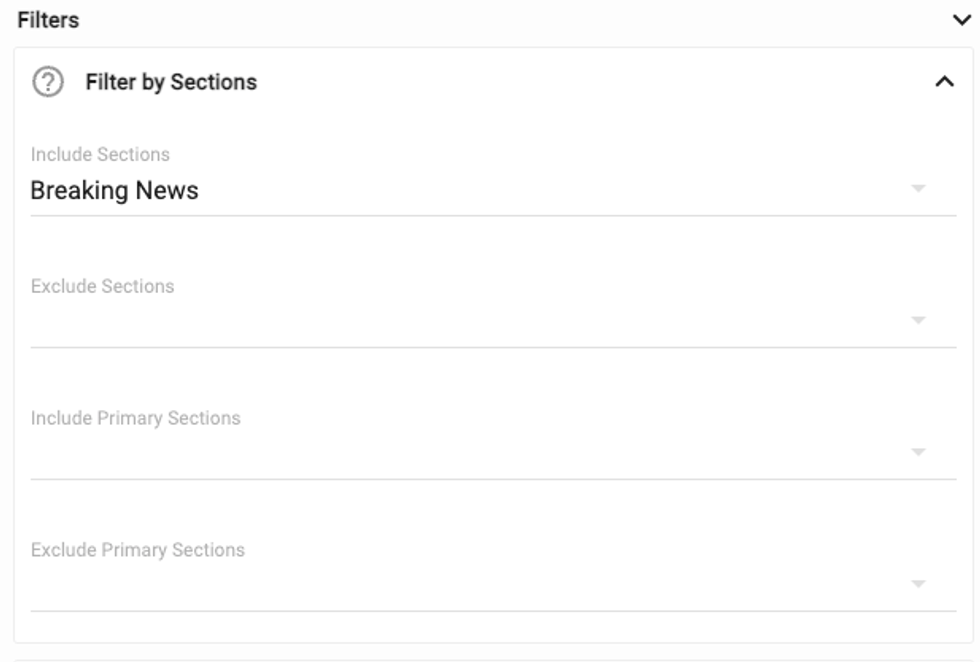
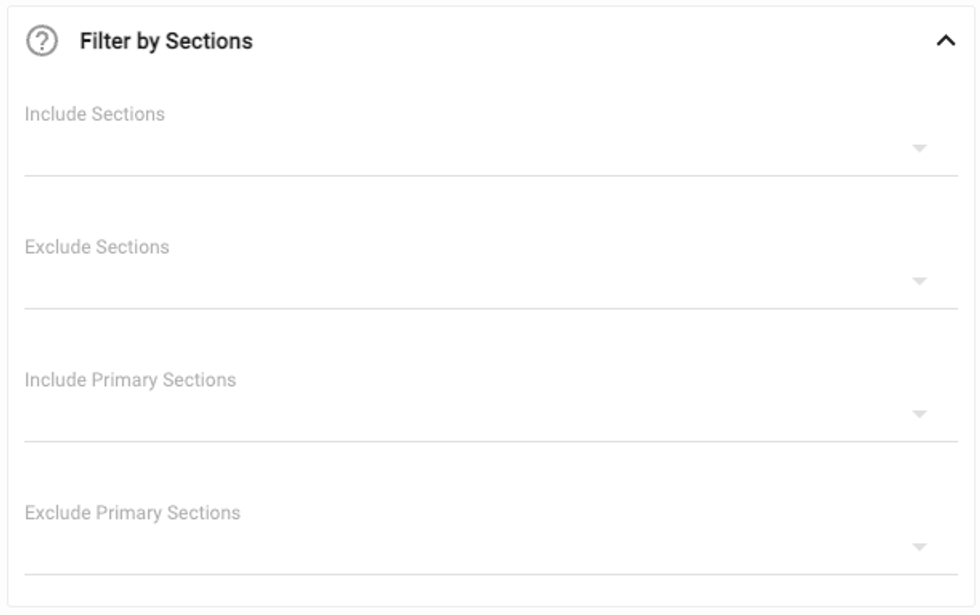
This interface allows us to select one or multiple sections or primary sections to pull content into the module. We can also choose to exclude sections as opposed to including them. For our first simple example, we’ll select to include the section Breaking News:
Now when we save the changes in L&D, our Posts element will only pull the first two posts chronologically from the Breaking News section. Here’s a screenshot of how it looks in L&D when you have a Posts element set up for a breaking news section:
Sidenote: You can also select multiple sections to be included in a module. For instance, we might want content from either our Breaking News section or our How-To section. Simply select both (or more) sections to accomplish this. You can also deselect sections by clicking them again in the interface.
If you want to do this in the opposite way, i.e., excluding sections instead of including, that’s just as easy. You simply select the sections (you can select as many as you want) you don’t want to have content pulled from and the module will only contain content from other sections.
This also works the same for primary sections. The drop-down menus for those categories work exactly the same way as regular sections.
Filtering by Current Post Details
Now let’s consider a more complex example. RebelMouse is able to recognize the underlying data around a post and allow you to very specifically select related content to show after a post.
Let’s set up a clear and complete example, so that we can have a clear understanding of what we’re trying to accomplish. For our example, let’s consider a site that covers a variety of topics, such as movies, music, sports, and technology. We want to showcase a blend of our content in the infinite scroll, so that we show some articles that are related to the article we landed on, and some of our newer content, regardless of the topic.
For this example, we’ll have four Posts elements in the following order:
- Current Post
- Related Posts
- New Posts
- Related Posts
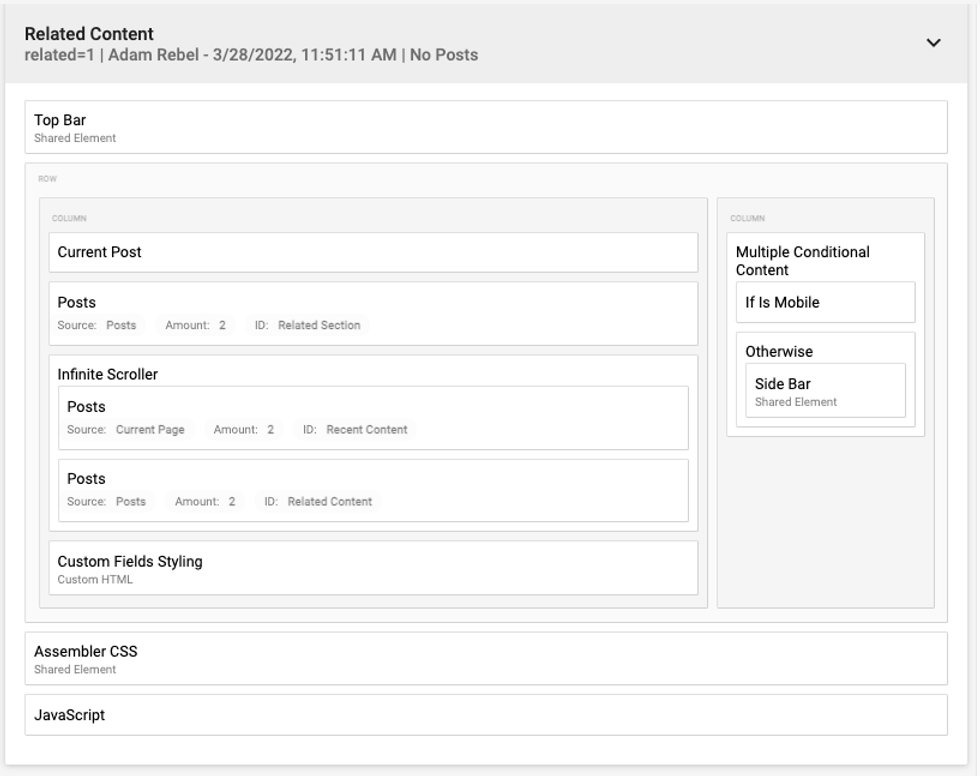
We’ll go through the steps for how to do all of the filtering, but first, here’s how it could look in L&D:
What you can see here, is that we have the Current Post element first, indicating that we show the post that a user clicked the related URL to see. Next, you can see a Posts element, with the source set to “Posts,” the amount of posts set to “2,” and the ID set to “Related Section.” Next is the Infinite Scroller wrapper that contains two Posts elements: Current Page and Posts. These two Posts elements will repeat as the infinite scroll.
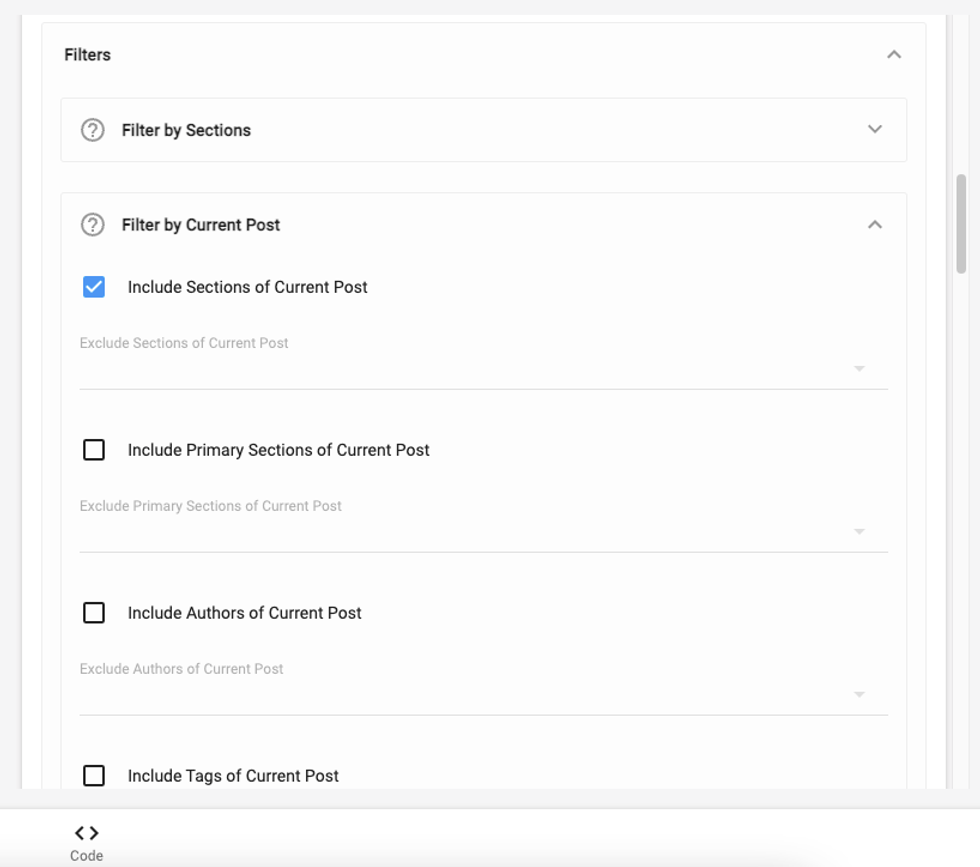
Let’s start by setting up the first Posts element, Related Section. First, you will select the Content Source as described above. Next, scroll down the right side of L&D until you see Filters, and then select Filter by Current Post:
From here you are able to select the exact filtering scheme that you want. For our example, we’ve just selected Include Sections of Current Post. In our example from above, this means that if I write a story about a movie (and place it in the movies section), when a user lands on that story, the first two posts in the infinite scroll will be from the movies section as well (or other sections that are applied to the current post, such as comedies).
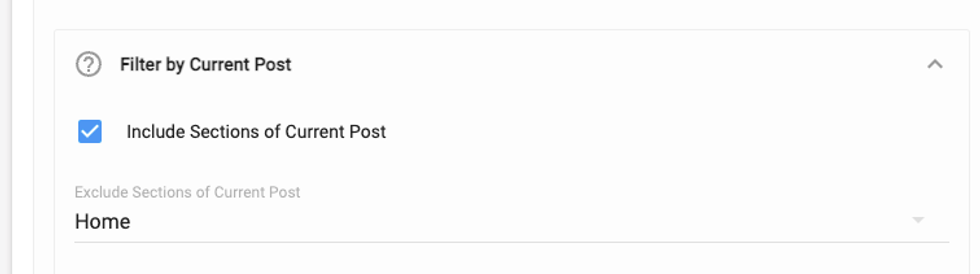
Note that it’s important to also exclude the home page section, as the filter will also allow content to show if the main post is assigned to the home page. Excluding is as easy as including, simply select the section you want to exclude:
Next, we will set up our recent content Posts element. The main difference between this and the related content, is that we select the Content Source Current Page.
Having the Content Source equal Current Page means that the platform will pull content depending on what page you are on. In our example, we are on a post page, so it will simply pull recent content from the home page. But you could also use Current Page on a section, and it would pull that section’s content as well. Alternatively, you could use a Posts (Default) Content Source and filter for the Home Page section only. That would have the same end result as using Current Page on the post page. But do note that if you select Current Page, the additional filters do not apply.
Additional Filtering Mechanisms
We have many additional ways to filter content. The general setup (i.e., selecting Content Source, Amount of Posts, Source ID, etc.) is the same for each, so we’ll just focus on the possible filters here:
- Filter by Sections: Discussed above, this allows you to filter posts by section(s).
- Filter by Current Post: Discussed above, this allows you to filter posts dependent on the data of the originally viewed post.
- Filter by Tags: Allows you to filter posts by tags. You can freely enter specific tags that you want to filter by (or exclude from).
- Filter by Authors: Allows you to filter posts by author. You can freely enter author names that you want to filter by (or exclude from).
- Filter by Post IDs: Allows you to filter posts by specific post IDs. This allows the most direct control over content in the scroll. To find a post’s ID, open the post in Entry Editor, and check the URL for the unique ID (i.e., the sequence of numbers at the end of the URL).
- Filter by Types: If you have different types of content (e.g., articles, recipes, how to’s, etc.) you can select to filter by specific type of content.
- Filter by Period: Allows you to filter posts by publication date details (e.g., published before date X, published after date X, etc.)
Note that you can also combine filters. For instance, perhaps I want to show a block of three posts by the same author, that live in a specific section, and were published since January 1, 2022. I’d simply set up the author filter to only include the individual author, the section filter to only show content in that specific section, and the period filter to only show posts published after January 1, 2022. The power and number of filtering options that are available is truly amazing!
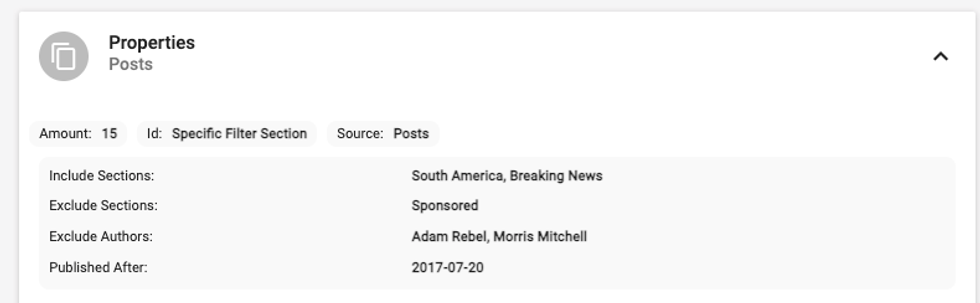
Here you can see the properties of a highly specific filtering mechanism:
So far we’ve only looked at filtering from the perspective of an infinite scroll of content. Let’s expand our view and look at recirculation content, such as in a sidebar.
Multiple Sources Filtering
Multiple Sources Filtering allows you to select multiple sources to pull content from and to select a particular strategy for how to filter it. We have three different filtering strategies:
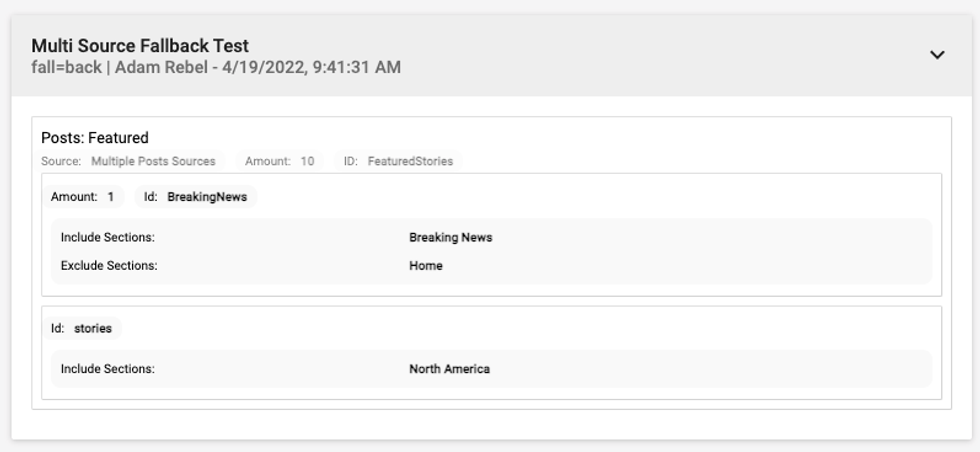
- Our fallback strategy loads the missing number of posts from the second and subsequent sources. For example, if you want to show 10 posts, but the first section you want to pull from only has five posts, we will pull the remaining five posts from the subsequent sections.
- Our max-limit strategy performs queries for the first sources with max limits. In order to minimize the impact on your site’s performance, those limits should not be large. For example, you may want to show 10 posts, consisting of a max of three posts from section one, a max of five posts from section two, and fill the remaining posts with content from section three.
- Our mutually exclusive strategy performs as few queries as possible, but requires the sets of posts from the sources to be mutually exclusive. Otherwise, there are going to be duplicates. For example, you may want to show 10 posts, where the first five posts are from section one, and the remaining posts are not from section one specifically, but from any other section.
Let’s see how this works. Below is a screenshot of a sidebar set up to show 10 posts using the fallback strategy. We are set to show up to 10 posts from the Breaking News section (but not the home section), and if we ever don’t have 10 posts in the Breaking News section, we will pull posts from the North America section.
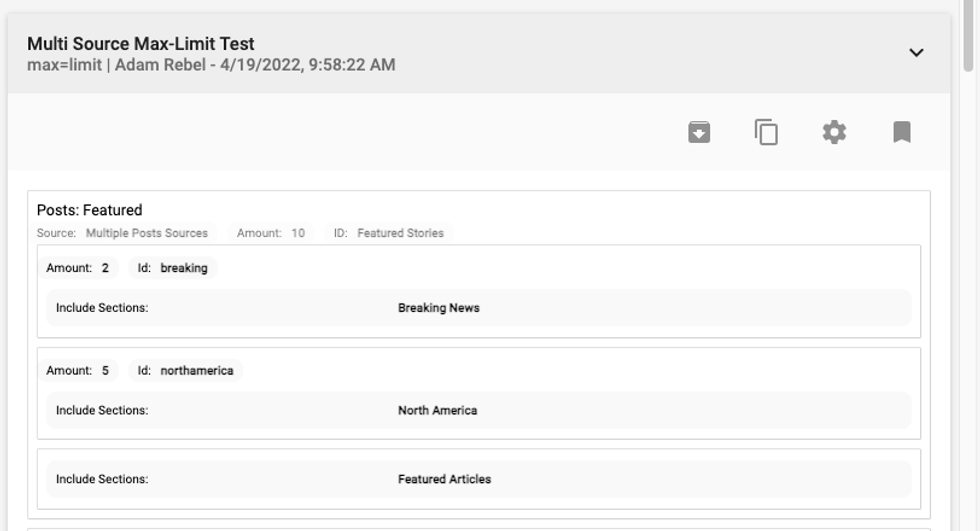
Additionally, here’s a screenshot of a setup using a max-limit filter:
In this example, we are showing 10 posts again, with a max of two from the Breaking News section, a max of five from the North America section, and filling in the rest of the 10 with posts from the Featured Articles section.
Filtering Content in the Sidebar
Filtering content in the sidebar follows virtually the same plan as filtering within infinite scroll. For instance, I might want to have a block of related content in the sidebar, followed by a block of featured content beneath the related stories.
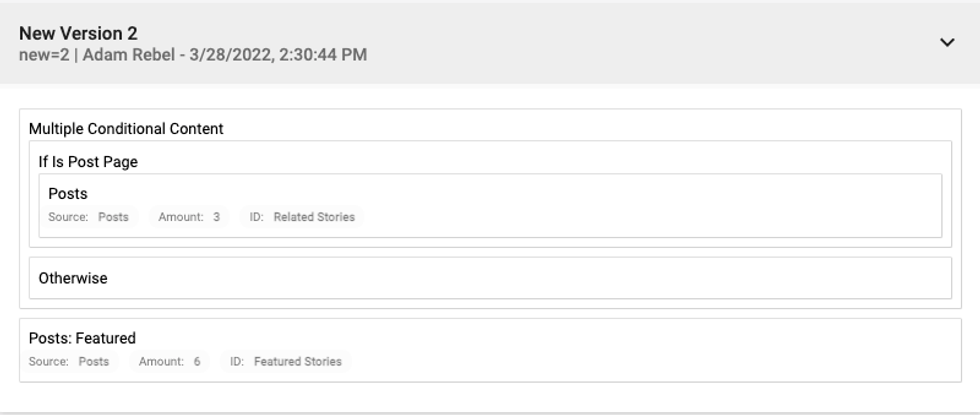
For this, we’d begin with a Multiple Conditional Content element, “If is Post Page,” so that we have a place for the related content. This is a critical step, as a sidebar will generally be a shared element across most of the site (e.g., home page, post page, section page, etc.). A home page or section page doesn’t have an individual post that can share details to pull related content. There of course will be many posts on a home page or section page, but they are arranged as a grouping, and not as an individual post followed by more posts.You can see that the filtering scheme is now the same as what we’re used to from the post page. The first Posts element specifies three posts from the same section as the post we landed on. Again, using our pop culture site, this means that if a user lands on a post in the movies section, the sidebar will show the most recent three posts from that section.
Following that is a Featured Stories module. For this, we have a section called Featured Stories, and we simply use the sections filtering to show the posts that are in the featured section. It’s important to note here that the Featured Stories module will show on every page that has the sidebar enabled since it’s not inside of the Multiple Conditional Content element.
These are the basic building blocks for filtering content using RebelMouse’s Layout & Design Tool. Remember to test using B-test layouts that aren’t live before trying to make changes to the live view of your site.
If you have any questions about this feature, please contact your account manager or email help@rebelmouse.com to learn more.
Not on RebelMouse yet? Let us help you streamline your publishing experience with a next-generation platform designed to drive more reach, traffic, and conversions. Get in touch today to see how we can help.


