

We recently introduced our Custom Feed Builder that allows you to create and edit RSS, JSON, and Atom feeds. In this article, we go into the process of creating and editing feeds in much greater detail. By following the directions in this post, you will be able to create custom feeds to match your specific requirements.
Dashboard
The first step is to access the Feed Builder. You can reach this dashboard by appending the following to your site's URL:
r/dashboard/feed_builder
If you would like to use JavaScript to build and customize your feeds, append the following address to your site's URL instead:
/r/dashboard/js_feed_builder
From here you can see various details about the feeds that have already been generated:
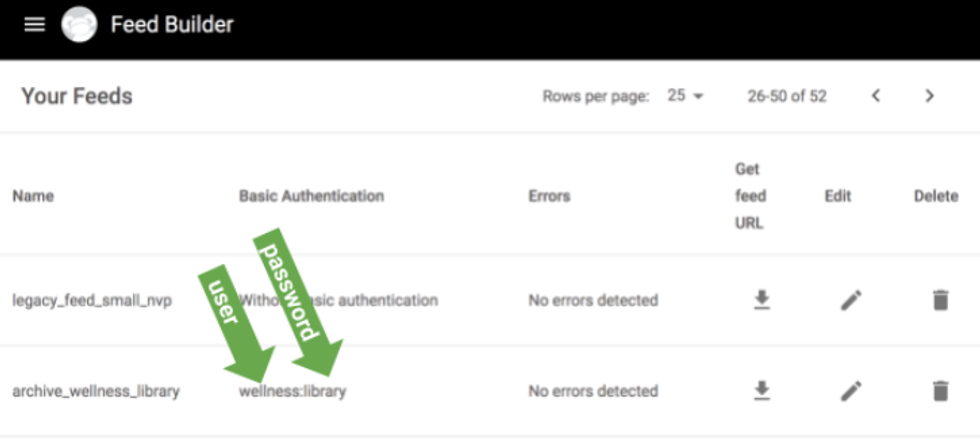
- Name: The name of the feed. The name of the feed is used in the feed URL (e.g., {site_domain}/customfeeds/feed/archive_wellness_library/json)
- Basic Authentication (Optional): If the feed has a base auth enabled in this column, we will show a password that is colon separated: {user}:{password} (e.g., wellness:library)
- Errors: If there are any errors in the feed, the errors will be listed in this column
- Get Feed URL: The links to all the feed formats (e.g., JSON, RSS, Atom, XML) can be accessed by clicking the download arrow icon
- Edit: Click the pencil icon if you need to edit a feed
- Delete: Allows you to remove a feed permanently from the system
How to Create a Feed
To add a new feed, click the ⨁ icon in the bottom right-hand corner. From there, you can enter your feed's name, code, and desired template. Within edit mode, you can also add basic access authentication, and even preview the feed before it goes live.
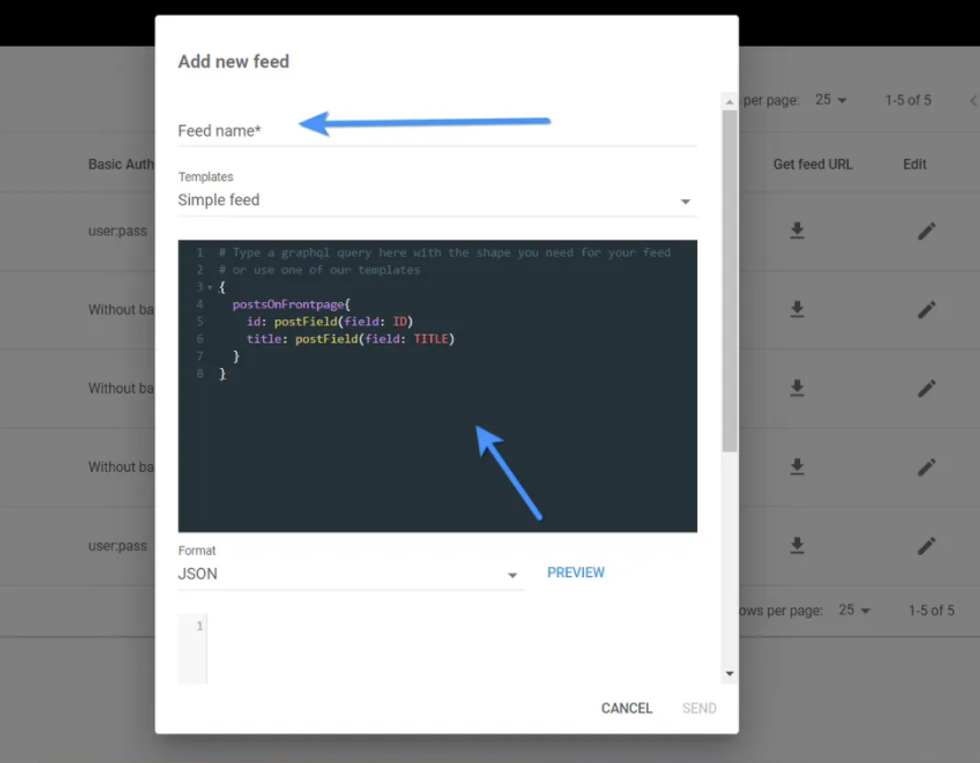
- Feed Name: Because this string is used in the feed URL, it is best to avoid special characters and quote or double quote symbols
- Templates: These are the default templates that are available:
- Simple Feed
- Simple RSS Feed
- Atom Feed
- SmartNews Feed
- Text Editor: We use GraphQL code for building feeds
- Format: Select a format from the drop-down menu and the preview of the feed will be loaded
- The feed is always available in all formats
- The drop-down menu has been designed for previewing the feed only; editing is not available in this view
- Basic Authentication: Name/Password is entered here
Common Fields
Here is the list of the most common fields:
// post ID:
ID: postFieldAsAttribute(field: ID)
// post DATE:
POSTING_DATE: dateAsAttribute(format: "DD-MMM-YYYY")
// post CUSTOM FIELD:
NEWS_TYPE: postField(field:CUSTOM_FIELD_NAME)
// post HEADLINE:
HEADLINE: postField(field: HEADLINE)
// post SUBHEADLINE with default value:
SUBHEADLINE: postField(field: SUBHEADLINE, defaultValue: " ")
// post BODY:
BODY: postField(field: BODY)
// post URL:
URL: postField(field: POST_URL)
// post MEDIA:
FEATURE_IMAGE: postField(field: IMAGE180X135)
// New Date():
NOW_DATE: printNow(format: "ddd, DD MMM YYYY HH:mm:ss ZZ")
How to Order Posts by Pageviews and Date
Sometimes you might want to order your feed by the most popular posts for a particular time range. You can easily add this information to your feed with the following:
{
2  findPostsBySearch(filters: {
3      order_by: POPULARITY,
4      order_by_period_in_days: 7,
5      ...
6    }
7  ){
8  ...
9  }
10}
Note that there are some specific limitations when it comes to ordering by pageviews:
- Pageviews ordering does not work with:
- Types Filter
- Authors Filter
- Tags Filter
- Pageviews ordering works in a limited capacity with:
- IDs Filter (only exclusion)
- Statuses Filter (phasing)
- Sections Filter (phasing when there is more than one included section, or has excluded sections, or order_period = lifetime)
- Period Filter (phasing)
How to Print a Static String
Sometimes you need static content in the feeds. All you need to do is print the same content in every item/article. For instance, you may need to have copyright information applied to each post.
Here is the method you need to use:
COPYRIGHT: print(content: "The string you want to use and <a href=\"http://www.google.com/\" target=\"_new\">Link</a>")
Result (RSS):
<COPYRIGHT>
<![CDATA[ The string you want to use and <a href="http://www.google.com/" target="_new">Link</a> ]]>
</COPYRIGHT>
How to Nest Elements and Attributes
In the feeds, it's possible to nest elements/tags and attributes. In the following example, the URL attribute is nested in the media:thumbnail:
<media:thumbnail url="https://assets.rebelmouse.io/eyJhbGciOiJIUzI1NiIsInR5cCI6IkpXVCJ9.eyJpbWFnZSI6Imh0dHBzOi8vYXNzZXRzLnJibC5tcy8yNjAyMjQ5MC9vcmlnaW4ucG5nIiwiZXhwaXJlc19hdCI6MTY1MjgyMTU5NH0.wsh0x7h3iTvsdlqSGWM13fPmvk7rw6fip8UXj4ord-w/img.png?width=300&coordinates=271%2C0%2C0%2C0&height=300"/>
Here is the GraphQL code we need to nest an element as an attribute:
media__thumbnail: nest {
     url: postFieldAsAttribute(field: IMAGE300X300)
   }
In the following case instead, the element snf:adcontet is nested in the tag snf:advertisement:
<snf:advertisement>
   <snf:adcontent>
       <![CDATA[ <div id='W183143'data-widget-placementdata-widget-host='habitat'data-endpoint='trends.netizen.co'data-widget-id='183143'></div><script src='https://assets.netizen.co/master/delivery.js' defer='defer'></script> ]]>
   </snf:adcontent>
</snf:advertisement>
This is the code you need to nest elements:
snf__advertisement: nest {
     snf__adcontent: print(
       content: "<div id='W183143'data-widget-placementdata-widget-host='habitat'data-endpoint='trends.netizen.co'data-widget-id='183143'></div><script src='https://assets.netizen.co/master/delivery.js' defer='defer'></script>"
     )
   }
How to Get Section Content Tags ID
The code below gets the content tag ID of the primary section of the post and generates the following name value pair:
<PARENT:SECTION>
    <SUB:SECTION CONTENT_TAG_ID="content_tag"/>
</PARENT:SECTION>
     PARENT_SECTION: postSections {
           SUB_SECTION: sectionTag {
               CONTENT_TAG_ID: printTagAsAttribute(toUppercase: true, trim:      true)
           }
       }
Conditional Content/Filter
The code below filters the sub section of a specific parent section and prints the title of the subsection enabled:
   PARENT_SECTION: postSections(filter: [{
       and: [{
          variableName: "parentId",
          operation: EQUAL_TO,
          value: "PARENT_SECTION_ID"
       }]
   }]) {
          SUB_SECTION: sectionField(field: TITLE)
   }
The code below checks if the user has the custom field is_raw_video set to true. If the condition is true, VIDEO_URL, VIDEO_TEXT, and VIDEO_IMAGE will be added to the feed:
  condition: {
     enviroment: [{
         and: {
             variableName: "is_raw_video",
             operation: EQUAL_TO,
             value: "true"
         }
     }]
  }) {
     VIDEO_URL: postMediaSource {
        mediaSourceField(field: DIRECT_URL)
     }
     VIDEO_TEXT: postField(field: VIDEOTEXT)
     VIDEO_IMAGE: postField(field: IMAGE1200X800)
 }
It's possible to filter the content of the feed by dates as well. All you need to do is to use date_from and date_to in the filters:
{
 ARTICLE: postsBySearch(
   filters: {
     include_sections: [CONSUMER_NEWS_IN_SPANISH]
     date_from: "2019-10-27 07:00:00"
     date_to: "2020-11-04 07:00:00"
   }
 ) {
   ID: postFieldAsAttribute(field: ID)
   . . .
Include/Exclude Sections
You can choose to either include or exclude specific sections. The code below shows how this is done:
{
 ARTICLE: postsBySearch(filters: {
     include_sections: [DOG],
     exclude_sections: [PUG, FRENCH_BULLDOG]  })
 {
   FEED CONTENT HERE
 }
}
How to Append Fields
For example, you may want to append the ID of each article, or a UTM parameter, to its URL. There are two methods for this:
concatPostFields(fields: [MEDIA_HTML, BODY])
idUrl: print(content: "{URL}-{ID}", replaceWithContent: [
       {find: "{URL}", replace: POST_URL},
       {find: "{ID}", replace: ID}
     ])
How to Add a Character
In the following example, we are using nameReplacer to add a colon to the variable:
{
 siteInfo(nameReplacer: {
   find: "__",
   replace: ":"
 }){
       title: print(content: "Title")
   link: print(content: "URL")
   lastBuildDate: printNow(format: "ddd, DD MMM YYYY HH:mm:ss ZZ")
   xmlns__content: printAsAttribute(content: "http://purl.org/rss/1.0/modules/content/")
   xmlns__dc: printAsAttribute(content: "http://purl.org/dc/elements/1.1/")
   xmlns__media: printAsAttribute(content: "http://search.yahoo.com/mrss/")
 },
 item: postsBySearch(
   filters:{include_sections: CONSUMER_NEWS},
   nameReplacer:{
   find: "__",
   replace: ":"
 }){
   title: postField(field: TITLE)
   link: postField(field: POST_URL)
   pubDate: date(format: "ddd, DD MMM YYYY HH:mm:ss ZZ")
   dc__creator: postAuthor{
     authorField(field: TITLE, , defaultValue: " ")
   }
   description: postField(field: SUBHEADLINE)
   content__encoded: concatPostFields(fields: [MEDIA_HTML, BODY])
   media__thumbnail:postField(field: IMAGE600X400, , defaultValue: " ")
 }
}
If you need any additional help, or require assistance to set up a custom feed, please contact your account manager or email support@rebelmouse.com.


