

RebelMouse's Importer tool (available via GitHub) was built to make importing your content into RebelMouse simple, fast, and accurate.
To help you get up and running on RebelMouse quickly, we've taken steps to automate as much of the migration process as possible.
Overview
This guide covers the process's three basic steps:
- Setting up Your Environment
- Preparing Your Data
- The Migration Process
Your Environment
Create Your Environment
You will first need a docker application on your local machine. Once this has been set up, you will need to download the RebelMouse Importer.
These are the only steps necessary to prepare your import environment.
Configure Your Environment
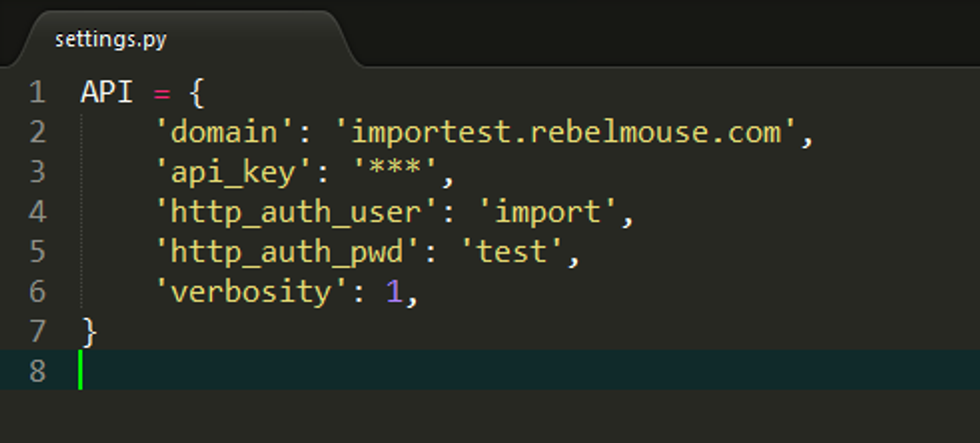
Once you've created your environment, you will need to configure it in order to start using the API.
We've made this configuration as simple as possible by placing a folder named settings.py with already-specified variables in a root folder of the RebelMouse Importer.
You will need to know your:
- Domain
- API token
- Basic authorization (e.g., username, password)
Prepare Your Data
Review Our Example
RebelMouse has API documentation and guides that you should get acquainted with first, but we know that the most helpful thing for any developer is ultimately a working example. For this reason, we've provided a WordPress example for you to review.
In the docker container, you will see three main elements:
- A data dump
- Data storage to keep processed data (MongoDB) between operations
- Scripts that use our public API and explain all the migration steps
Set up in XML
Following the WordPress example provided (altering it as needed for your specific application), set up your data in an XML format.
Once it's ready, you can simply copy and paste.
Migration Process
Objects
To start, we have to import four kinds of objects:
- Media assets
- Sections
- Authors
- Posts
The easiest way to ensure that this is done correctly is to start from scratch. To do this, you'll want to start from an empty RebelMouse site (Runner) that doesn't contain any existing posts or sections.
Migration Steps
- Upload the Dump: The dump file is already in place since it's already been used for testing multiple times.
- Parse the Dump: Depending on your specific use case, the whole import process might be as simple as running one script. However, for demoing purposes, let's go through it step by step.
- Dump Parsing Process (~30 seconds)
- The first step is the dump parsing process. This will extract all of the needed data from the source file and store it in MongoDB. It will also get rid of all of the unnecessary data so it's easier to analyze the content. This process only needs to be performed once, which speeds up additional import attempts when needed.
- Dump Parsing Process (~30 seconds)
- Import Images: Next, we'll begin the import process for images.
- Import Sections: Now it's time for sections.
- At this point in time, we can only handle standard sections. Support for nested sections was added to our API recently, and will be added to the Importer's functionality soon.
- Import Authors: Next up is the creation of authors. There's nothing special behind this process, as it's very similar to the process that we use for all WordPress imports.
- Import Posts: At this point, all media, sections, and authors have been imported. Now we can import posts.
- Check for Errors: Different kinds of errors may occur during the import process. We save and log them all so a developer can go back and debug and/or fix them.
- There may be serious issues that will require closer attention.
- There may also be insignificant errors that can (and should) be ignored.
- For example, something that should be ignored is a completely broken post draft that can't be imported. It should not be imported as there is no need to migrate bad data to your new site.
- Import Completed: Check the results to be sure that everything looks as expected.
If you have any questions about this process, email support@rebelmouse.com or talk to your account manager. If you're running into an issue or error, please be sure to include screenshots and details about the nature of the problem so we can better assist you.
Good luck!


